


Archive for
Jewellery Photography: ‘Let the Light do the Talking’
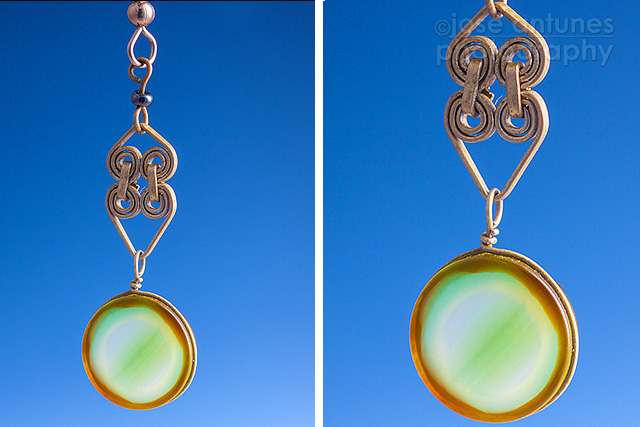
We’ve highlighted tutorials on various kinds of photography, such as Landscape Photography and Flower Photography, on this blog. One we haven’t covered is Jewellery Photography. Jose Antunes brings just such a how-to for beginners on Photo Tuts+.
One good thing about photographing jewellery is that you don’t need space – a tabletop will do.
What you will need – and all you really need to get started – is a light source (a window), a macro lens, and some or another kind of reflector, which is easily found or constructed considering the tiny scale of the subject, and you’re good to go.
Antunes writes: “light has color, and that light changes. If you’ve a red wall in the background its tone will probably influence everything around.” Look at the four photographs of the same ring against different backgrounds near the top of the webpage. Note how the colour of the background is reflected in the band of the ring but, more than that, imparts a tint to the hue of the stone. You can use this fact to your advantage by simply trying reflectors of different colours.
“The goal for most jewelry photography is to create soft even light with very little shadow,” writes Antunes and his image of a pendant is a lovely example. However, he also writes, “You can also use flash, . . . . One flash will be enough, two will be great, . . .”
If, instead of creating soft, even light you want to produce a dramatic, mysterious effect with highlights, pronounced depth, and hard shadows, you’ll need flash. (Or, if you’re sufficiently advanced or ambitious, an appropriate lighting setup.)
As the tutorial says, “When shooting macro photos, your depth of field will be very shallow due to the small distance between the object and your camera. Because of this, it’s not uncommon to use apertures above f/11.” What this means, in turn, is that unless you use flash (or a high ISO, which you don’t want to do) you can’t handhold your camera. And so, a tripod is not only a nice-to-have, it’s almost a must-have. Instead of a tripod, a minipod tripod (not monopod) or tabletop tripod may be a better idea for this type of photography.
After all’s said and done, light is surely the most critical ingredient in Jewellery Photography. Look at the last pair of photographs on the webpage. They are meant to show how different the same ring looks when shot on an opaque black surface and when placed on a mirror. But look at how radiant, translucent, and captivating the stone looks in the second photograph and how dull and filmy it looks in the first. That’s light talking, and this last pair of photos is the compelling argument to ‘let the light do the talking’.
Charming Children, Fascinating Fotos, and Awesome Waves
On this blog we do a weekly roundup of Photography News that is unusual, even peculiar or weird. Today, however, this weekly post is about charming, fascinating, and awesome Photography News.
Charming Children
Grant Podelco brings the story of a photographer who focusses on children with their toys.
Gabriele Galimberti’s series of photos does not aspire to be high art; rather, it is a charming document of childhood, highlighting that which is most precious to children of different socioeconomic strata and different nations.
One can’t help but wonder at the collection of cheap plastic sunglasses owned by a happy little girl in Zambia (5), or marvel at the Kenyan boy’s sole pride and joy, an old stuffed monkey (2), and compare it with the play riches of the Chinese toddler (7).
Don’t miss contrasting the Albanian doll-like girl surrounded by a slew of dolls in a pink bedroom (12) with the Latvian boy with his countless corgi, matchbox and other toy cars (13) – classic girl and boy toys!
Do you wish that Galimberti had come by your house when you were a child?
Fascinating Fotos
Tim Barribeau brings our fascinating segment in PopPhoto. He recently reported on ‘Living Photographs’. Though admittedly quirky and unusual, this technique of building a picture or composition was also indubitably an advanced form. It seems to have reached its high-water mark back in 1918.
Technically, the most fascinating point is that “the compositions had to be designed to correct for the perspective of the 80-foot tower the photographs were taken from, so fewer people had to be at the base of the image than at the top.” This is clearly visible in several photographs. The process of creating and setting up a single photo “took weeks.”
To actually see these photos, you’ll have to go elsewhere – Barribeau’s feature presents only one.
An extensive gallery of these images has been compiled by Vincze Miklós on io9.com. It has several truly fascinating ‘living photographs’, including an eye-catching Liberty Bell, complete with crack, made up from 25,000(!) people.
It reminds one of the old child’s toy, Picture Peg, but being played with persons in coloured clothes as the pegs.
Awesome Waves
If ever a title precisely, exactly, nailed a hard-to-describe set of images, “frozen sculptures” to define Pierre Carreau photographs of waves is it. Lauren Davis introduces Carreau’s photos on io9.
However, what you see on that page is merely an appetizer; Davis points her readers to Carreau’s website.
The textures, glints, shapes, that you see in the first slideshow are simply astonishing. Some of the waves look more like sculpted ice and Neptune-carved glaciers.
Proceed to the second slideshow to be astonished all over again, this time by the awe-inspiring magnificence and heft of the waves.
Because the shutter-speed is so extremely high (is there a 1/50000 speed?!), the waves are ‘frozen’ and all feeling or effect of motion is lost. Though there is field blur, in many photographs there’s nary a trace of motion blur. This somehow deceives the eye and brain into thinking that one is looking at some fantastical real-life still object – a “frozen sculpture.”
Light Painting with Darlene Hildebrandt
If HDR is yesterday’s craze then Tilt-Shift and Light Painting are probably duking it out to be crowned today’s craze. For those who’re inclined to give their vote to the latter, Darlene Hildebrandt presents the first of a multi-part lesson on Light Painting in DPSchool.
This article is unusually systematic and logical in its organization; it’s more like a chapter of a Photography Book than your usual tutorial.
First, Hildebrandt provides an outline of her tutorial’s contents. The systematic approach is shown by her setting out the equipment first and even dividing this into “The ‘Must Haves’” and “The ‘Really Nice to Haves’.” With a beginning like this you know the author is going to be thorough. (How thorough? This thorough: “a penlight or small flashlight [your cell phone can work in a pinch] to be able to check camera settings and find an item in the bottom of your bag . . .”)
On to Camera Settings where the author gets into the principles of the technique as she explains how to achieve correct focus and the use of Bulb – open-ended shutter speed. The most informative nugget falls in the ISO bullet point, however. Even though you’re shooting at night you’re advised “it is always best to choose the lowest ISO possible” to minimize noise and also bypass the wait that the long exposure noise reduction feature on newer cameras will entail.
Hildebrandt’s thoroughness transitions into helpfulness as she makes several suggestions on finding, and even devising, good subjects to light-paint on in the dark, especially if you’re a beginner.
The technique of actual light painting is the real ‘meat’ of this valuable tutorial. This section has information ready and available that one would otherwise learn only through much trial and error:– How close to get to the subject, how to achieve an abstract look, where to aim the flashlight, to ‘keep moving’ – all these tips and many more will get you from square zero all the way to square ten, so to speak, on Light Painting. Learning and applying these tips and tricks will almost surely make your first foray a qualified success.
Part 1 even provides a handy-dandy diagnostic checklist at the end so you can make any necessary tweaks and adjustments.
Sony World Photography Award Winners
One of the biggest events in the World of Photography is the aptly named World Photo. World Photo London 2013 is underway now at Somerset House.
This two-week event includes numerous talks, exhibitions, lectures, prizes, and such but its centrepiece is, of course, Sony World Photography Awards and the related exhibitions.
Sony broadly divides entries between a Professional and an Open section, each of which is subdivided into categories. While one may expect images of the highest quality in each division, the staggering variety in every sense of the word of images in the Open section has to be seen to be believed.
Martina Biccheri’s win in the Architecture category is an interesting one. How and why did such a simple image win the top prize?
First, Biccheri photograph is a simple, not-so-simple, composition with lateral symmetry. The texture of, and the fall of light on, the edifice gives it life. However, the real ‘trick’ behind this image is the combination of an obvious, heavy diagonal (the shadow) and the Rule of Thirds. This combination is what introduces – besides a perception of depth – a pleasing imbalance to the lateral symmetry.
Compare the riot of colours and dynamism in the very next image to the sedate, austere, intellectual appeal of Biccheri’s study – a great example of said variety.
Gilbert Yu’s photograph of an Asian festive celebration in the nighttime is a triumph of exposure, catching the moment, and, probably, some post-processing. It’s easy to see without any analysis that the joy and energy emanating from Yu’s image won the Arts and Culture category. Note, though, that the line of the merrymaking participants in the background stretching to the right side of the image provides both depth and balance, setting off the main subject in the foreground, besides conveying the true scale of the festivities.
The very next image, Hoang Hiep Nguyen’s winner in the Enhanced category, is a favourite. This art photo of a little girl in the wind is a winner in so many aspects: mood, motion, hues, tints, composition, story. This, of course, is a ‘concept photo’ that’s brilliantly executed and post-processed.
One compositional point is worth mentioning. The figure of the girl divides the frame vertically into a third and two-thirds and the dark sky, grey cloud, and beige grass divide the frame horizontally into three one-thirds. Also note the effect of wind and movement throughout the image.
View the many winners in the other categories and see which your favourite is.

 Follow us on Facebook for all the latest in canvas printing news and exclusive deals!
