


Posts Tagged ‘macro photography’
Tutorials: Far Out and *Also* ‘Far Out’ . . .

English: Ansel Adams The Tetons and the Snake River (1942) Grand Teton National Park, Wyoming. National Archives and Records Administration, Records of the National Park Service. (79-AAG-1) Français : Ansel Adams. Les Grands Tetons et la rivière Snake (1942). Parc National des Grands Tetons, Wyoming. Archives Nationales des USA, Archives du service des parcs nationaux. (Photo credit: Wikipedia)
We take in two tutorials at the ‘long’ and ‘short’ end of the lens today. One has to do with Landscape Photography and the other with close-in Macro Photography!
From Far Out . . .
Elliot Hook’s Landscape Photography tutorial in DPSchool addresses the question Where to Position that Horizon? Hook relates the ‘rules’ and also explicates just when and where to break the rules. The ‘rules’ for high and low horizon explained, Hook shows when and where to go for a centred horizon.
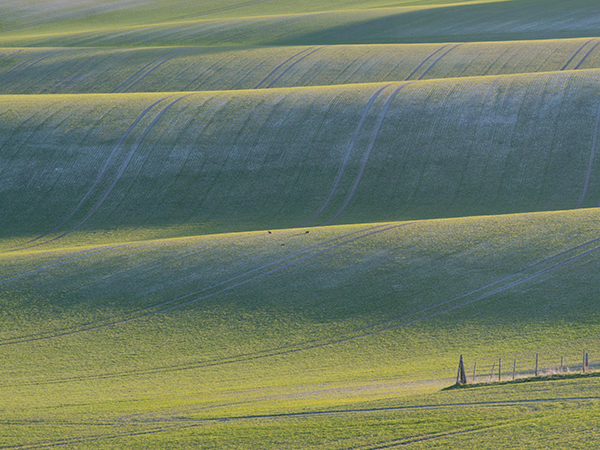
He also says that you can entirely omit the sky if the landscape itself has sufficient interest and detail, illustrating the point with a picture of a textured, undulating meadow. Actually, waterfalls and cascades are an excellent example of scenes in which one can omit the horizon.
Aspect ratio has a little something to do with horizon positioning as well. A panoramic landscape will generally look best with a horizon that is off-centre but not dramatically so. A vertically-oriented composition, however, will benefit from horizons that are well off centre, close to the top of the frame. Also, assuming that the subject-matter is complementary, 1:1 aspect ratios and centred horizons go very well together as the symmetries reinforce one another.
Vantage point and angle of elevation will also influence the placement of horizon.
Also ‘Far Out’ – in a Different Sense
How about photographing a landscape reflected in a water drop? That’s the technique you can learn in Harold Davis’s how-to, Photographing Waterdrops: Exploring Macro Worlds, published on Shutterbug.
Davis has a philosophy around photographing waterdrops; he says that having a “visual structure” and “metaphorical stage” is important if you want to create an image such as this soothing semi-abstract photo. Fortunately, you do not have to go that far because he also provides some more nuts-and-bolts type of guidance.
To begin with, he explains why it’s a good idea to use macro flashes and what their effects are. However, he also provides tips on how to photograph sunbursts in a drop – and that can only be done with natural lighting.
Davis’s text relays which weather conditions provide the best opportunities for photographing waterdrops. You can also learn a few tricks from the detailed exposure information provided with each image
If you’re psyched for this kind of photography but only find a ‘blah’ droplet on a ‘blah’ setting, add one or another type of diffraction filter to your lens and see what it does!

Jewellery Photography: ‘Let the Light do the Talking’
We’ve highlighted tutorials on various kinds of photography, such as Landscape Photography and Flower Photography, on this blog. One we haven’t covered is Jewellery Photography. Jose Antunes brings just such a how-to for beginners on Photo Tuts+.
One good thing about photographing jewellery is that you don’t need space – a tabletop will do.
What you will need – and all you really need to get started – is a light source (a window), a macro lens, and some or another kind of reflector, which is easily found or constructed considering the tiny scale of the subject, and you’re good to go.
Antunes writes: “light has color, and that light changes. If you’ve a red wall in the background its tone will probably influence everything around.” Look at the four photographs of the same ring against different backgrounds near the top of the webpage. Note how the colour of the background is reflected in the band of the ring but, more than that, imparts a tint to the hue of the stone. You can use this fact to your advantage by simply trying reflectors of different colours.
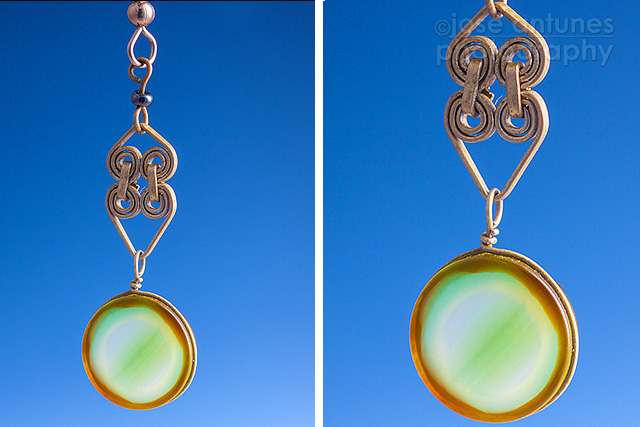
“The goal for most jewelry photography is to create soft even light with very little shadow,” writes Antunes and his image of a pendant is a lovely example. However, he also writes, “You can also use flash, . . . . One flash will be enough, two will be great, . . .”
If, instead of creating soft, even light you want to produce a dramatic, mysterious effect with highlights, pronounced depth, and hard shadows, you’ll need flash. (Or, if you’re sufficiently advanced or ambitious, an appropriate lighting setup.)
As the tutorial says, “When shooting macro photos, your depth of field will be very shallow due to the small distance between the object and your camera. Because of this, it’s not uncommon to use apertures above f/11.” What this means, in turn, is that unless you use flash (or a high ISO, which you don’t want to do) you can’t handhold your camera. And so, a tripod is not only a nice-to-have, it’s almost a must-have. Instead of a tripod, a minipod tripod (not monopod) or tabletop tripod may be a better idea for this type of photography.
After all’s said and done, light is surely the most critical ingredient in Jewellery Photography. Look at the last pair of photographs on the webpage. They are meant to show how different the same ring looks when shot on an opaque black surface and when placed on a mirror. But look at how radiant, translucent, and captivating the stone looks in the second photograph and how dull and filmy it looks in the first. That’s light talking, and this last pair of photos is the compelling argument to ‘let the light do the talking’.

 Follow us on Facebook for all the latest in canvas printing news and exclusive deals!
